Friday, January 18, 2008

Eating Asian the Frugal Way, Congee


Congee.
One way to incorporate frugal zen into your food bugdet, is to explore ethnic foods. If you have access to a farmer's market or an ethnic market like Asian or Mexican, you can often purchase cheap ingredients and make fantastic meals. Most of my ancestors come from Europe, but my husband was born in Bangkok, Thailand. It is really easy, almost imperative, that I add Asian dishes to our menus. My mother-in-law has taught me some really good dishes, but some of my favorites are the cheapest and easiet.

Congee is actually a Chinese name for this Asian common breakfast or dinner. It can be found at Dim Sum houses in China town here in Chicago. Most Thai's I know eat this for breakfast or a late night snack, but I love it for a quick, nutritious, filling dinner.

Rice. The most important part of a Congee Dinner. I either use left over rice or uncooked rice. Place rice in a saucepan and add way too much water. It will turn out soupy, and that is what you want. It's actually a rice porridge, but I don't like the way that sounds, so I use the Chinese name congee. If I have 2 cups cooked rice, I would add 2 cups water and heat to boiling. I might or might not add more water depending on the consistency desired. There is no right or wrong consistency, I like mine a little less soupy than my husband does. I usually cook it to the consistency that I like, and then add a little hot water to my husband's bowl when I serve it.

Accompaniments. Served with the congee are an assortment of protein and veggies. I usually make a three egg omlette cooked in olive oil. When I am preparing the eggs, I add a tsp of fish sauce, or nam pla, but if you don't have access to it, a little salt will do just fine.

Immediately after the omlette is finished cooking, I throw 1/4 to 1/2 cup roasted, salted peanuts into the omlette pan. I don't turn off the heat, and toss the peanuts around the pan for 1 or 2 minutes until they just start to brown and you can smell the peanuts cooking. As soon as the peanuts are browned, pour them into a bowl. Don't let them burn. BE CAREFULL!!! These are very hot.

I also serve some preserved asian vegetables. I get these little cans at my local asian market, but if you can't find them, parboiled green beans, cooked carrots, or another cooked vegetable would be just fine. Note: if you can't find pickled veggies, add a little soy sauce to the congee. The brine from the pickled veggies gives a nice salty flavor that you will otherwise miss.

Another thing we like to eat is dried shredded pork. It looks a little like dryer lint, but it is really good with congee. It is sweet and a little salty and after rehydrating in the congee has a nice tender chewiness to it.

To eat your congee, place small bits of egg, veggies, pork, and a few peanuts in the bowl. Some people like to mix, but I usually don't and add more as I go.

This is actually quite filling, and it is very inexpensive to serve. The little cans of veggies usually cost 75cents or less, the dried pork is about 2 dollars - and it will last a while, you won't eat it all in one meal, and the rice, eggs and peanuts are nominal.

Enjoy!!!

Thursday, January 17, 2008

Whole Wheat Pancakes


In an effort to add more fiber to my diet, this weekend I made a hearty breakfast that included whole wheat pancakes. To purchase a premade mix is crazy, especially if you have the ingredients in your pantry, and if you do, they are oh, so easy to make.

1 cup whole wheat flour
1/4 cup white flour (I use my bread flour)
1 heaping tsp baking powder
1 heaping tsp baking soda
1/2 tsp salt

Put the above in a large bowl and mix together.

In another bowl mix;
1 cup milk
1 egg
1 tblspoon honey
1 tsp vanilla

Heat a skillet over medium heat until drops of water do the "Hot Skillet Dance". Mix wet ingredients into the dry ingredients, don't overmix. Sometimes I add a little extra milk, but this batter is meant to be a little on the thick side. Pour batter onto non-stick skillet. We like 3 -4 inch pancakes, but make the size that you and your family enjoy. These pancakes won't bubble like regular flour pancakes do. The bubbles don't "pop" so I watch the first batch closely and turn when the pancakes stop looking shiny and the edges look a little brown. After the first batch, I can better guage the time for turning.

Sometimes I add a tablespoon or 2 of flaxseed to the batter. The seeds give a nice nutty flavor and a little crunch.

Serve warm with syrup, powdered sugar, jelly, fruit, or plain. Plain or with blackberries are my favorite ways, these pancakes really have a great flavor.

Enjoy!!

Monday, January 14, 2008

Washing Storage Bags


I wash storage bags. I struggled for a long time trying to find the best way to dry my bags without making me and my family crazy. I used wooden spoons in my dish rack, clothes pins on a line, my son's power rangers action figures (only kidding, but it might work!).

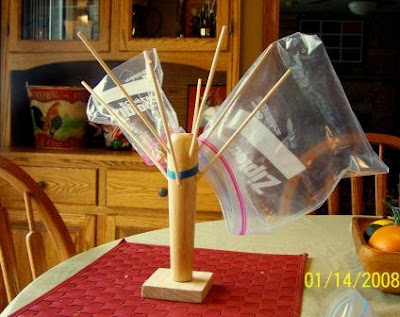
One day, I happened to have a chopstick in my dish drainer. It was the perfect height for drying the bags and it didn't take up a bunch of room in my dish drainer. "Hey", I thought, "I have a bunch of these that I saved from Chinese take out. How can I make this more user friendly?" So, I went out to my garage and I found some scrap wood. I used leg from a broken stool and cut a small square from a piece of scrap. Next, I found a drill bit that was a similar size as the chopsticks. I drilled 8 holes in the stool at about a 45 degree angle around the leg. I attatched the square of wood to the stool for a base, popped in the chopsticks, PRESTO, a free bag dryer!! A thick rubber band that once held broccoli is used for storing the chopsticks while not in use.

Look around your house. You don't need to use a stool leg, any leftover 2 inch dowel or closet rod would work. Chopsticks are easy to find cheap or free with a meal.

This is a real easy way to creat something very useful with little to no money, just a little imagination and elbow grease.

Friday, January 11, 2008

Pork Chops and C.S.A.


Today, we are having pork chops, mashed potatoes, and spinach for dinner. This summer, we frequented a farmer's market just south of our home. We found this family who raises free range pigs and sells them periodically throughout the year. We ordered 1/2 hog from them and it was delivered in October. Since we are fortunate enough to have an extra freezer, this has been an excellent way to incorporate organic food into our diet in an inexpensive way. This is the best pork I have tasted in a long time. They raise them organically, and if I may age myself, it tastes like pork used to taste like before it became the "other white meat".

This family also owns a CSA. CSA is "consumer supported agriculture". Here's how it works. Usually a small farm owner wants to grow more crops organically. He or she options a CSA. Consumers pay an up front fee at the beginning or well before the growing season of 300-600 dollars depending on how much of a "share" they want. The farmer uses these funds to support his farm and the consumers get a "share" of the produce that is grown throughout the season. A share is usually picked up weekly and consists of a portion of whatever is ready to eat. In the spring a share might consist of a lot of greens. Mid-summer a share would consist of tomatoes, cucumber and other summer vegetables. Late summer-early fall would be squash and root vegetables.

It's a great way to eat organically while not putting a huge dent in your budget and at the same time supporting local business and agricuture.

On the down side, if for whatever reason the farm does not produce a lot, drought, freezes, floods, you don't get a refund for non-production. But I look at it this way, it's good for the environment. If I support a local organic farmer, if he has a bad year but is still getting local support, he won't sell to the BIG agricultural farm that will use pesticides, fertilizer and hormones that eventually will leech into the ground water and thus into my family's food supply. I win either way.


I have posted a link to a good site to search for a CSA, farmer's market or co-op near your home. Purchasing organically grown, in-season food is a great way to feed your family. Not only are you not consuming hormones and chemicals, but you are reducing your carbon footprint because your produce did not ride in a truck cross country to get to the grocery store.

So, tonight, we are eating pork chops. Pork chops that were not fed hormones or given antibiotics, pork chops that did not ride in a truck to get to my table, and pork chops that taste really, really good.


Thursday, January 10, 2008

Our hallway art gallery

My son's fall art

Semi-framed Wall Map


My son's work in a black frame with black mat.

Art is where you find it....


I love art.
I love color and shape and texture and form. I could live in the Art Istitute (where I have been) or the Louvre (where I have yet to be). When it came time for me to add art, and thus joy, to my own home, I couldn't afford "real" art from the galleries. But I was able to find "real" art for my home, with a little creativity, at little to no cost.

If you have children, you have art. I have taken quite a few of my boys' art projects, framed them in cheap black frames with black mats, and presto... beautiful art for my walls. There is something about the black frame and black mat that gives them a museum type quality.

Sometimes, I have created art myself. In my den, I pulled the colors from my walls and furniture and just created a color study. I used blue painter's tape to form rectangles on a cheap artist's canvas, painted the rectangles in the colors I chose, and again... art for my walls. In my bedroom, I used 3 different large canvases (I waited for a sale and a coupon for the canvases), painted them 3 colors that suited my decor, and again, art.

In my son's room, I placed a large map of the world on his wall, bordered it with scrap 1 by 2 wood on top and bottom... functional art. He pushes pins into the map to record what places he has visited.

In my upstairs hallway, I hung long bars that I suspend my children's artwork from. I can change the pieces frequently and I am not making extra holes in the walls.

I get a lot of compliments from family and friends about our art and the way it is displayed. I get personal satisfaction that the art in my home is truly personal and it didn't put a dent in our budget.

Look around your home. There is probably art sitting right in front of you and you might not realize it. Take out some of your children's art, paint a cheap canvas an accent or complimentary color to your decor. Frame a postcard. The choices are endless.

Wednesday, January 9, 2008

Soup, it warms the soul.


Soup.... I love soup, especailly during the colder months. Yesterday, I dropped off something at my 90 year old grammie's house, and while preparing to leave, she asked me if I wanted a ham bone. She said she had ham a few days before and didn't know if she could use it. So, to my house it went.

I looked through my cold box and found leftover mashed potatoes that I had prepared skins on and had not whipped, but slightly mashed. PERFECT! I also had a bag of navy beans. Wonderful. I made this delicious bean soup in my large soup pot... and we ate it with some of that leftover crusty bread.

Ham and Bean Soup

Ham Bone leftover with meat bits
leftover mashed potatoes
onion chopped
2 garlic cloves
salt
pepper
water
navy beans (I think I had a 1lb bag)

Sort and wash navy beans. Place in a large pot and cover with 2 inches water. Bring to a boil. Cover and let boil for 3 minutes. After 3 minutes, turn off heat and leave covered for 1 hour. Meanwhile, place ham bone in large soup pot. Add just enough water to cover. Add chopped onion and garlic. Bring to boil, reduce to simmer for 1 hour. When beans are finished, drain and rinse, and then add to ham bone pot. Bring back to boil, boil for 20minutes more and add mashed potatoes. Bring back to simmer. When beans are soft, mash with a potato masher by pressing masher towards bottom of pot. You don't want to mash all the beans, just some to get a good soup texture. Salt and pepper to taste, and serve.

This is one of the soups that tastes better the next day. We have enough for the rest of the week. Yum!

(you could add carrots or celery to this soup for extra flavor and a bit of fiber, but, alas, I did not have any in my cold box.)

Sunday, January 6, 2008

Another Bread Recipe


I love bread. Especailly a good crusty bread, but a really good crusty bread can be expensive, or at least more than 3 dollars. I found this recipe in the latest copy of Mother Earth News, and let me tell you, it is so worth trying. I tweaked the instructions a little, I almost never follow a recipe exactly, and WOW is this a good bread. It's crusty, cruchy and chewy on the outside, tender, moist and chewy on the inside. Perfection. And, best of all, it didn't cost over 3 dollars.

The Best Crusty Bread Ever (adapted from Mother Earth News issue 225)

1/4 tsp plus one pinch yeast
12 oz warm water - about 95 degrees
3 cups bread flour plus more for dusting
1 1/2 tsp salt

Dissolve yeast in a large bowl with the water. Add flour and salt, stir until blended. When blended, cover with saran and then a dark towel. Let this sit for about 12 to 18 hours at room temp.

The next day, when the dough looks bubbly, flour a work surface and your hands. Pull dough out of bowl and work in in the dusting flour a little. Fold the dough in the flour until the dough is not sticky. Shape dough into a ball, cover with saran wrap and let sit for 15 minutes.

After 15 minutes, lightly flour a bread towel (or dish towel) set the dough ball in the middle. Dust the top of the dough with more flour, then put another towel on top of the dough. Place dough in a warm area and let rise for 2 1/2 hours until about double in size.

Heat oven to 475. Place empty covered dutch oven in heated oven and let heat for 20 minutes. Place dough ball into heated dutch oven, cover and bake for 30 minutes. After 30 minutes, uncover dutch oven and continue baking for 4 minutes. Check every 2 minutes until desired color is achieved. Remove bread from oven, place on cooling rack for at least 2 hours before cutting. (or if you will eat it all immediately cut into after 30 minutes) To store cut bread, place bread cut side down onto a platter and leave on counter.

Try this reipe, you won't be disappointed.

Bread


Bread... So simple... So basic...

Bread. In the U.S., we eat a lot of bread. Sandwiches, toast, rolls, pancakes(raised flour), even cookies. Bread can be SOOO good, and good for you. Unfortunately, there is a lot of bad bread out there. I've found in my frugal travels, that cheap bread often does not taste good and it can be bad for you as well.

For about 40 cents I can buy a loaf of airy, dry, bad for me bread at the discount grocery store, or I can bake my own. I know, I know, who has time to bake bread? Well, it's not that hard and you will LOVE the results. I will show you two ways to make really good bread with just a little effort.


Get a bread machine. They can be expensive if you purchase one at the department store, but that is totally not neccessary. Everytime I go to our local thrift store, I see at least 5 bread machines available for under 20 bucks. I suspect that these machines were purchased by their original owners with good intentions, but like all new toys, the machines lost their luster, and then found new homes at the resale shop. You win!!

You don't need to use a "mix". I recently mentioned to a girlfriend that I was saving money baking my own bread in the machine and she said, "But those mixes are so expensive, how can you be saving money?" Mixes are uneccessary when the ingredients are available and cheaper.

Basic Bread Recipe for Bread Machine

9 oz warm water - pour in pan first (1 cup plus 2 tablespoon)
3 cups bread flour
3 tbsp dry milk
2 tbsp sugar
1 1/2 tsp salt
2 tbp butter - cut into 4 pieces and placed in the corners of the pan
2 tsp yeast - placed into a "well" of the dry ingredients in the pan

Place all ingredients in the pan in the order written, place pan in machine, select bread setting (my machine is basic setting), hit start, and wait for the aroma of baking bread to fill your home.


If you plan to make a lot of bread, like me, I suggest purchasing flour and yeast in bulk. It's not too expensive to purchase them in bulk. I can get a 25 lb bag of flour for about 15 dollars at Costco and a 1 or 2 pound vaccuum pack of yeast for about 7 dollars. These bulk ingredients usually last 6 months to a year for our house. You will need to invest in storage containers, but it will be worth the cost.

Make sure the flour you purchase says either gluten flour, bouncer flour, or bread flour. All-purpose or cake flour will not work well in the bread machine.

For storage, I purchased food grade air-tight dog food containers. To make sure you are purchasing food grade plastic, look at the bottom of the container. If the recycle triangle has a 1, 2, or 5 in the center, from my research, you can use it to store flour. If you scavange 5 gallon plastic buckets from the donut shop, just make sure the container originally held food and not paint or chemicals. Many times, bakeries or delis will give you their old buckets or sell them to you for a few dollars.

When you store your flour, add a few bay leaves to your container. I usually stick a few in the bottom and then tape a few to the inside lid to keep bugs away.

I keep my yeast in a recycled coffee can in the fridge. Your yeast will keep much longer in an air tight, opaque container, especially if it is kept cool.


I haven't worked out the math yet... I'll get to it one day.. but I guarantee that the bread you make yourself will be worth the initial investment. I can't imagine that this bread could be anywhere near the cost of the bread you purchase in the grocery store. You will LOVE serving this bread to your family.

Bread.

Living Frugal


The Frugal life. I've been trying to incorporate this into our lifestyle for a while now. At first, I was met with a lot of resistance. Why should my boys bring home their sandwich bags? Didn't I know that it was much easier to just throw them away? Well, I have finally indoctrinated them into my way of thinking. It took a few years, but we are all on the same page now.

I am starting this blog to track our frugalness. I am going to add tips and tricks to show how we live frugal AND green. It brings me peace to know that not only am I saving money for our family, I am doing little things for the world. I realize that I am just one suburban home in our huge world, but sometimes big changes start with small actions.

I'm not going to beat people down in hopes that others start to think like me... hopefully others will learn from my example. If you looked at me at the store or library, you wouldn't say, "Hey, she looks like a composter!" or "I bet she washes out ziplock bags to help the environment!" I look like any other suburban stay at home mom. I get my hair done every few months. I drive a minivan (most of the time with the back seats removed to save on gas - and I try to make my errand days as efficient as possible). We own a big screen television. We have 2 dogs. I am trying to show that you don't have to sell your house and live on a ranch in Montana to incorporate frugal green living into your lives.

So, here we go!